
If you’ve been circling around OpenClaw, wondering if it’s just another AI wrapper or something you’ll actually use long term – good news: it’s the latter, once you get it running. OpenClaw isn’t just a bot launcher. It’s a self-hosted gateway that turns your messaging apps into a control center for agents that can reason, act, and even call tools.
But like most powerful tools, the first 30 minutes can feel like stepping into the cockpit of a small plane. This guide trims the fluff, skips the config rabbit holes, and walks you through how to actually use OpenClaw in the real world – from install to your first working workflow.
What Is OpenClaw and Who It Is For
At its core, OpenClaw connects your chat platforms to AI agents (like Claude or local models from Ollama), giving you a gateway to automate tasks, route messages, and run real tools behind the scenes.
OpenClaw isn’t for people who want to dabble with AI in a browser. It’s for developers, builders, and curious problem-solvers who want an always-on assistant that lives where they already work: messaging apps. If that’s you, and you’re not afraid of a terminal, you’re in the right place.
Here’s what makes OpenClaw worth considering:
- You want self-hosted control (not handing data to a cloud chatbot).
- You use messaging apps daily (and want AI inside them).
- You want to connect tools, not just have conversations.
- You’re comfortable with light CLI and config work.
How OpenClaw Works (Quick Mental Model)
Before diving into install steps, let’s get the architecture straight.
OpenClaw is made of three core parts:
- Gateway: The heart of it. This routes messages between channels and agents, keeps sessions isolated, and handles multi-agent logic.
- Control UI: A browser dashboard (localhost by default) where you can chat, debug, monitor workflows, and update settings.
- Agents & Tools: The logic layer. This is where messages are interpreted, tools get triggered, and actions are taken.
How the Message Flow Works in OpenClaw
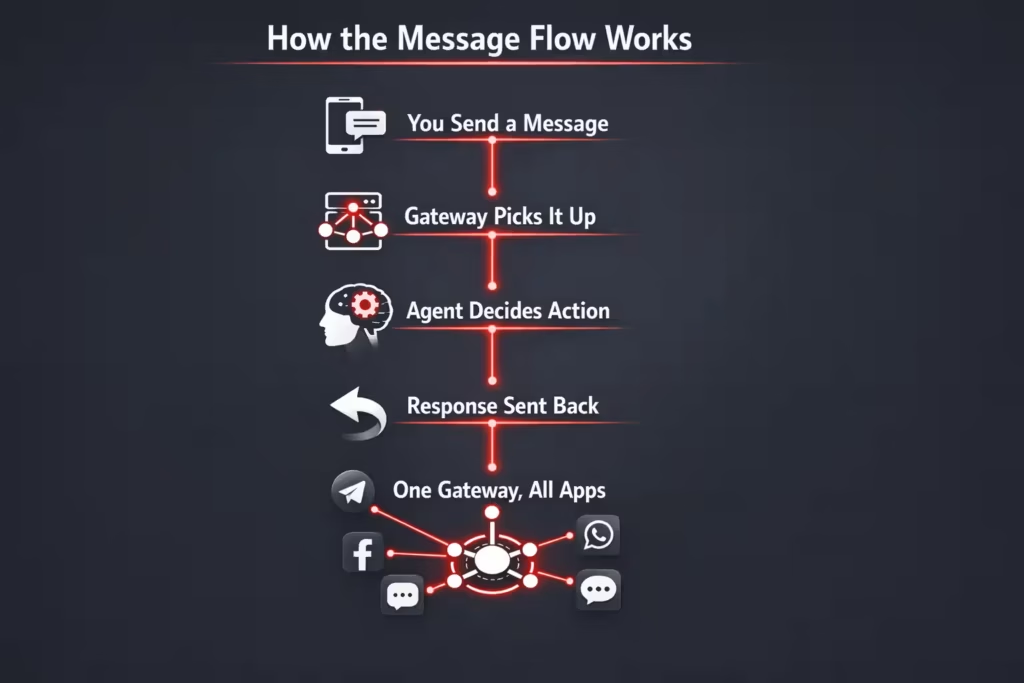
OpenClaw might seem complex at first glance, but once you understand how a single message moves through the system, it clicks into place. Here’s a simple breakdown of what actually happens behind the scenes when you send a message.
1. You Send a Message
It starts with you typing something into a connected app – maybe Telegram, WhatsApp, or Discord. That message is the trigger. It could be a prompt, a command, or just a question for your AI agent.
2. The Gateway Picks It Up
OpenClaw’s Gateway is always listening. Once it sees the message, it doesn’t just forward it blindly. It routes the message to the right agent based on your config, session, or workspace rules.
3. The Agent Decides What to Do
This is where the brains kick in. The agent looks at your message, pulls in relevant context, and decides what should happen. It might just reply. Or it could call a tool, access data, or take some kind of real action.
4. The Response Gets Sent Back
Whatever the agent comes up with, whether it’s a reply, confirmation, or output from a tool, that response flows right back through the same chat channel you used. No separate app, no switching tabs.
5. You Don’t Need to Build a New Bot for Every App
This is the beauty of OpenClaw. Once your Gateway is running, it can handle all your channels in one place. No need to write separate bots for each messaging app. One setup powers all of them.
What You Need Before You Start
Setting yourself up properly saves a lot of future pain. Here’s what to gather first:
- Node.js v22 or higher.
- A Linux or macOS machine (Windows works best with WSL2).
- One messaging channel account (WhatsApp, Telegram, Slack, Discord, etc.).
- A model choice: hosted (Claude, OpenAI) or local (via Ollama).
- A simple task you want to automate (e.g. summarize notes, log a ticket).
You don’t need to build your whole AI assistant right away. One working flow is enough to start.
Installing OpenClaw: Step-by-Step
The cleanest way to get started is through the CLI.
1. Install the OpenClaw Package
It is the first step to take. Use:
npm install -g openclaw@latest
This installs OpenClaw globally on your machine.
2. Run the Onboarding Wizard
Turn to:
openclaw onboard –install-daemon
This sets up your Gateway, runs the background service, and walks you through the basics. If you’re wondering whether it’s working, wait until it says the Gateway is live and running.
3. Open the Control UI
The dashboard runs locally by default:
http://127.0.0.1:18789/
If you don’t see anything, double-check that the Gateway is running. Also, make sure nothing else is using that port.
Now, Connect a Chat Channel
This is where most people overcomplicate things. Keep it simple.
Start with one channel. Telegram or a test WhatsApp account is a good starting point. Avoid Slack until you’re confident.
Pair the channel:
openclaw channels login
This launches a pairing flow (e.g. a QR code for WhatsApp). Once paired, messages will start flowing into OpenClaw.
Use a private chat first, not a company-wide group. Make sure the Gateway can receive and reply end-to-end before doing anything fancy.
Choosing Your Model: Cloud vs Local
OpenClaw lets you pick the brains behind the agent. You can go cloud (Claude, OpenAI) or local (via Ollama). Each has pros and cons.
Use a Cloud Model If:
- You want speed and less setup.
- You’re okay paying for API usage.
- You need more advanced reasoning.
Use a Local Model If:
- You care about privacy and control.
- You want offline capabilities.
- You’re fine managing your own stack.
Your First Working Workflow
This is where the magic starts. A talking agent is cool, but one that takes action? That’s where it becomes a real assistant.
Pick something simple and useful. Here’s a template to frame your first task.
Workflow “Create a Support Ticket”:
- Trigger: Use “new ticket” in Telegram.
- Input: Message includes customer name, issue, urgency.
- Tool: Connects to your CRM or Helpdesk API.
- Confirmation: Agent replies with ticket ID and summary.
Once that loop works, you’ve got a functional assistant. From there, it’s easier to expand than to start over.
OpenClaw Configuration Tips
If you want to lock things down, OpenClaw config lives at:
~/.openclaw/openclaw.json
For example, only allow messages from your number on WhatsApp:
{
“channels”: {
“whatsapp”: {
“allowFrom”: [“+15555550123”]
}
},
“messages”: {
“groupChat”: {
“mentionPatterns”: [“@openclaw”]
}
}
}
Use it to limit who can trigger actions or set rules for groups (e.g. requiring mentions).
Testing: Don’t Skip This Part
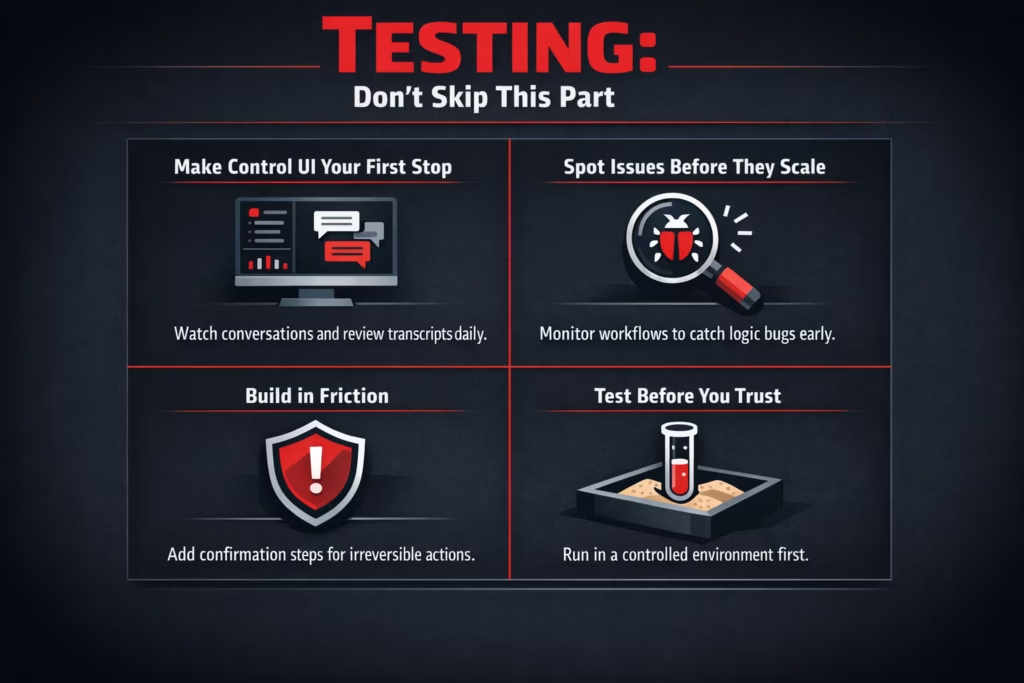
Once your agents start doing more than just chatting back, testing stops being optional. You’re giving them the ability to take action – sometimes in places that matter, like tools, data, or messages that go to real people. That kind of power needs a safety net.
Make the Control UI Your First Stop
The Control UI isn’t just for setup. It’s your day-to-day window into how things are running. It lets you watch conversations as they happen, review transcripts after the fact, and get a clear picture of what the agent sees and does. If something goes sideways, this is where you’ll catch it first.
Spot and Fix Issues Before They Scale
Agents don’t always behave perfectly the first time around. You’ll want to monitor how your workflows trigger, see what inputs your tools are getting, and confirm the outputs make sense. It’s much easier to catch a logic bug or misfire here than to backtrack after something breaks in production.
Build in Friction Where It Matters
For anything that could lead to irreversible changes, like deleting records or sending payments, it’s smart to slow things down. Add confirmation steps, put up guardrails, and make sure your agent asks before doing anything that can’t be undone. That small bit of extra caution goes a long way when your assistant starts interacting with live systems.
Test Before You Trust
When you’re building a new workflow, keep it in a controlled environment first. Let the agent run in a kind of test mode, where nothing permanent happens until you’re confident it’s working the way it should. A few extra minutes of testing up front can save you a lot of cleanup later.
In short, treat testing like a habit, not a phase. The more power you give your agent, the more important it becomes to know exactly what it’s doing and why.
Keeping It Always-On
If you want OpenClaw to behave like a real assistant, it has to stay online.
You have a few practical ways to run it:
- Your own laptop: Fine for testing and short sessions.
- A VPS or cloud server: A solid middle ground if you want reliable uptime.
- A hosted VM on a provider: Set it up manually and keep it running in the background for an always-on setup.
If you’re using a VPS, set up the service to auto-start on reboot and keep the port open in your firewall. Tailscale or Cloudflare Tunnel can help with remote access.
When OpenClaw Isn’t Enough On Its Own
At some point, your assistant might outgrow just being a chat interface. That’s when you’ll start feeling the limits of what OpenClaw handles out of the box and realize you need to build a more complete product around it. Maybe the Control UI no longer gives you the visibility you need, and a proper admin dashboard becomes necessary. Or you find yourself managing multiple users and needing some form of access control and permissions to keep things organized.
As workflows get more complex, you’ll probably want a way to store state, track past actions, or remember user preferences – something persistent beyond just session memory. And when it’s time to invite others in, whether that’s teammates, clients, or end users, you’ll need a frontend where people can interact with your assistant without needing to message it directly.
At that point, OpenClaw becomes the backend logic layer, quietly doing its job in the background while your new interface takes the spotlight. It’s still essential, but now it’s part of something bigger.
Useful Use Cases to Explore
If you’re not sure what else to build, here are some ideas that work well with OpenClaw:
- Personal inbox summary sent to Telegram every morning.
- Slack bot that alerts you when your GitHub repo gets new issues.
- WhatsApp agent that logs your voice notes as to-do items.
- Telegram bot that schedules reminders and syncs with Google Calendar.
- Discord assistant that tracks content ideas from chat threads.
These use cases all follow the same structure: trigger → input → tool → response.
Final Thoughts: Is OpenClaw Worth It?
If you want a flexible, self-hosted, privacy-respecting way to talk to AI through your own channels, OpenClaw is absolutely worth setting up.
It does require some effort upfront, and it’s not for the impatient. But the payoff is solid: an assistant that lives inside your existing workflow, runs your logic, and actually helps you do things instead of just chatting.
Start with one channel. Wire up one workflow. And build from there.
Absolutely. Here are 6 grounded, human-written FAQs to match the tone and structure of the article:
FAQ
Not really, but being comfortable with the terminal helps a lot. You’ll use CLI commands during setup and may tweak a JSON config file here and there. If that sounds scary, this might not be your first pick. But if you’ve ever installed a dev tool or used npm, you’ll be fine.
Yes, but with a catch. OpenClaw works best on Linux or macOS. If you’re on Windows, the recommended approach is to use WSL2 (Windows Subsystem for Linux). It’s an extra step, but worth it for smoother performance.
You’ve got options. You can plug in cloud models like Claude or OpenAI, or go the local route. If you care about privacy, local’s great. If you want raw power and don’t mind using APIs, hosted models make sense.
It depends on how you set things up. That’s why testing and confirmation prompts are key. Don’t let an agent delete data or send money without a second layer of protection. OpenClaw gives you full control, but that means you need to think through what you allow.
If you didn’t set up OpenClaw to run as a background service or on a server, it’ll stop. For a real assistant that stays online, you’ll want to deploy it on a VPS or cloud box and set it to auto-start. It’s easy to forget until it goes offline and you’re wondering why it’s not answering.
Start with something low risk but useful. Logging to-do items, summarizing messages, or creating support tickets are all solid first steps. Keep it simple and get one loop working before you pile on features.