
Quick Summary: Resetting an iPhone erases all content and settings, returning it to factory conditions as if brand new. The device will require initial setup again, but if backed up beforehand, all data can be restored from iCloud or a computer. Without a backup, everything including photos, contacts, apps, and settings is permanently deleted.
The moment arrives. Your iPhone is acting up, you’re preparing to sell it, or you just want a fresh start.
You’ve heard about resetting the device, but what actually happens when you hit that “Erase All Content and Settings” button? Does everything disappear instantly? Can you get your photos back? Will your Apple Watch still work?
Here’s the thing—resetting an iPhone isn’t just one action with one outcome. Different reset types exist, each with distinct consequences. Understanding exactly what happens during each process can save hours of frustration and potentially years of memories.
This guide breaks down every aspect of iPhone resets: what gets deleted, what stays safe, and how to make sure nothing important vanishes forever.
Understanding Different Types of iPhone Resets
Not all resets are created equal. Apple offers several reset options, and confusing them can lead to unintended data loss.
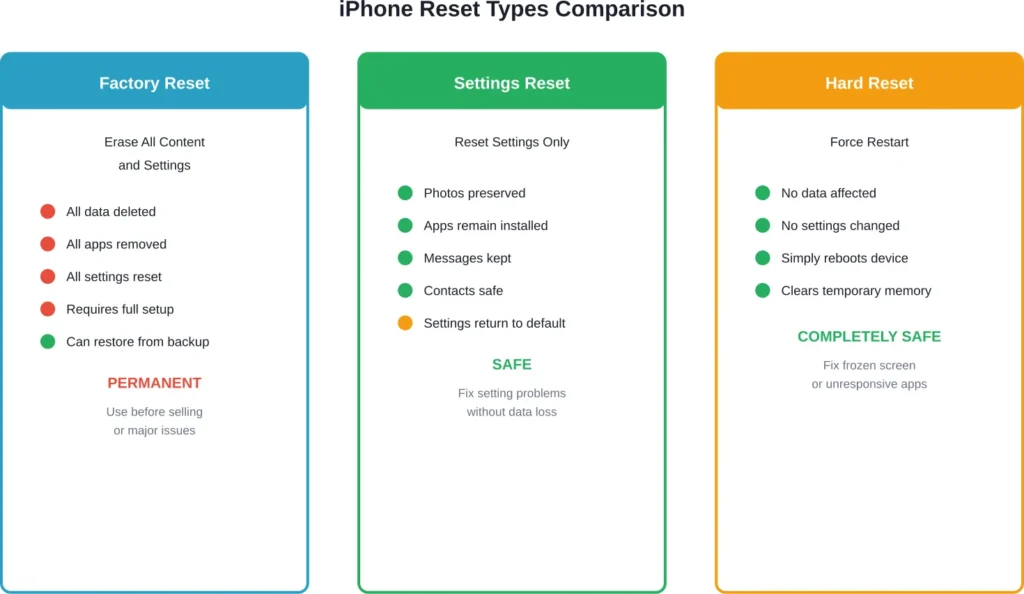
Factory Reset vs Settings Reset
A factory reset—officially called “Erase All Content and Settings”—wipes everything. According to Apple’s official support documentation, this returns the device to the exact state it was in when first removed from the box.
Every photo, message, app, contact, and custom setting disappears. The iPhone will require complete initial setup again, including language selection, Wi-Fi connection, and Apple Account sign-in.
Contrast this with a settings reset. This option returns settings to their defaults without erasing content. Photos stay put. Messages remain. Apps don’t disappear.
Settings that get reset include network settings, keyboard dictionary, home screen layout, location settings, and privacy settings. But the personal data that makes the device uniquely yours stays intact.
Hard Reset vs Soft Reset
A hard reset simply forces the device to restart. No data gets erased.
This troubleshooting step helps when the iPhone freezes or becomes unresponsive. The method varies by model—newer iPhones require pressing volume up, then volume down, then holding the side button until the Apple logo appears.
A soft reset, or standard restart, involves powering off the device normally through settings and turning it back on. Again, no data loss occurs.
Neither of these should be confused with factory resets, which permanently delete everything.
What Actually Gets Erased During a Factory Reset
When initiating “Erase All Content and Settings,” the deletion is comprehensive and immediate.
Personal Data Removal
Photos and videos vanish first. Every image in the Camera Roll, including screenshots, downloaded pictures, and edited versions, gets permanently deleted from the device.
Messages disappear next. iMessages, SMS texts, and attachments sent through Messages all get wiped. Group conversation histories, shared photos within chats, and message effects—all gone.
Contacts follow. Every phone number, email address, and contact detail stored locally gets removed. If contacts were syncing with iCloud, they’ll return when signing back in. If not, they’re lost.
Calendar events, reminders, notes, voice memos, and health data all get erased. The Health app data, including step counts, heart rate measurements, and medical information, disappears unless previously backed up.
Apps and Associated Data
Every downloaded app gets deleted. This includes apps from the App Store, configuration files, cached data, and any information stored within those apps.
Game progress disappears unless the game syncs with Game Center or its own cloud service. In-app purchases remain tied to the Apple Account, but local save files vanish.
App settings and preferences get wiped. Custom notification preferences, app-specific accounts, and locally stored files all disappear.
Device Settings and Configurations
Wi-Fi networks and passwords get deleted. The device won’t remember home, work, or any previously connected networks.
Bluetooth pairings disappear. Connections to AirPods, Apple Watch, car systems, and other Bluetooth devices get removed.
Wallpapers return to default. Custom home screen and lock screen images get replaced with stock Apple wallpapers.
Accessibility settings, display settings, sound preferences, and notification configurations all reset to factory defaults.
Face ID and Touch ID get removed. Biometric data gets securely deleted from the device’s Secure Enclave.
What Doesn’t Get Erased
The operating system stays intact. iOS itself remains on the device and updates to the latest version during the reset process if needed.
Carrier settings persist. The cellular carrier profile typically remains, though eSIM handling varies based on choices made during the erase process.
Activation Lock stays active if Find My was enabled. Even after erasing, the device requires the original Apple Account credentials to activate again—a security feature preventing theft.
The Reset Process Step-by-Step
Understanding the technical sequence helps clarify what’s happening behind the scenes.
Initial Verification
The device first requests authentication. Either the device passcode or Apple Account password must be entered to proceed.
This security measure prevents unauthorized erasure. Someone finding a locked iPhone can’t simply reset it and claim ownership.
Erasure Sequence
Once confirmed, the device begins cryptographic erasure. Modern iPhones use hardware encryption, meaning all data on the device is already encrypted with keys stored in the Secure Enclave.
During reset, the iPhone simply destroys these encryption keys. Without the keys, encrypted data becomes mathematically impossible to recover—even more secure than traditional deletion methods.
According to NIST Special Publication 800-88 guidelines for media sanitization, cryptographic erasure methods render data access infeasible for a given level of effort. Modern iPhones use hardware encryption with keys destroyed during reset, making data recovery extremely difficult.
The process typically takes 5-15 minutes depending on storage capacity. Devices with more storage take slightly longer, though the difference is minimal.
Post-Erasure State
After completion, the device displays the “Hello” screen in multiple languages—the same screen that appears on brand-new devices.
At this point, the iPhone enters activation mode. It needs internet connection, language selection, and Apple Account sign-in to become functional again.
If Activation Lock is enabled, only the original Apple Account can activate the device. This prevents theft and unauthorized resale.
Backup: The Critical Step Before Resetting
Backing up before resetting makes the difference between inconvenience and catastrophe.
iCloud Backup Process
iCloud offers the most straightforward backup method. Navigate to Settings, tap your name, select iCloud, then iCloud Backup, and tap Back Up Now.
The device must be connected to Wi-Fi and preferably charging. Backup time varies based on data volume and connection speed—anywhere from minutes to hours.
iCloud accounts include a free storage tier, with additional storage available through iCloud+ subscription plans.
iCloud backups include photos, videos, device settings, app data, HomeKit configuration, Health data, and messages. Content already synced to iCloud may not be duplicated in backups to optimize storage usage.
Computer Backup via Finder or Apple Devices App
Backing up to a Mac or PC creates a local copy on the computer. This method doesn’t count against iCloud storage and often completes faster.
On Mac running macOS Catalina or later, use Finder. On Windows or older Macs, use the Apple Devices app or iTunes. Connect the iPhone via cable, select it when it appears, and choose Back Up Now.
These backups can be encrypted for additional security, protecting sensitive information like passwords and Health data with a password-protected backup file.
What Backups Don’t Include
Certain content doesn’t transfer through backups. Content purchased from iTunes, App Store, or Apple Books gets redownloaded from Apple’s servers rather than backed up.
Face ID and Touch ID settings don’t back up for security reasons. These get reconfigured after restore.
Apple Pay information doesn’t back up. Cards must be re-added to Wallet after restoring.
Some app data may not back up if developers haven’t enabled backup functionality. Checking with specific app developers before resetting can prevent surprises.
| Backup Method | Storage Location | Speed | Cost | Best For |
|---|---|---|---|---|
| iCloud Backup | Apple’s servers | Depends on connection | Free tier available, additional storage through subscription | Convenience, automatic backups |
| Computer Backup | Mac or PC hard drive | Usually faster | Free (uses computer storage) | Large data amounts, privacy concerns |
| Both Methods | Cloud and local | Varies | Varies | Maximum data protection |
How to Perform Each Type of Reset
Different situations call for different reset methods. Here’s how to execute each one.
Factory Reset (Erase All Content and Settings)
Navigate to Settings, then General, then Transfer or Reset iPhone. Tap “Erase All Content and Settings.”
The device prompts for the passcode. Enter it.
Next comes Apple Account password verification. This ensures the person resetting owns the account.
A confirmation screen appears explaining what will happen. If using eSIM, choose whether to erase it or keep it. Erasing requires carrier reactivation later.
Tap “Erase iPhone” to confirm. The device begins the erasure process immediately.
Reset Specific Settings Only
For targeted fixes without losing data, Settings offers several options under General > Transfer or Reset iPhone > Reset.
“Reset All Settings” returns settings to defaults while preserving content. Use this when settings conflicts cause problems but data remains fine.
“Reset Network Settings” deletes saved Wi-Fi networks, Bluetooth connections, VPN configurations, and cellular settings. Helpful when experiencing connectivity issues.
“Reset Keyboard Dictionary” removes learned words. The keyboard returns to suggesting only built-in dictionary terms.
“Reset Home Screen Layout” reorganizes apps to default positions. Folders get ungrouped and apps arrange alphabetically.
“Reset Location & Privacy” returns location permissions and privacy settings to defaults. Apps must request permissions again.
Force Restart for Unresponsive Devices
When the iPhone freezes completely, force restart becomes necessary.
For iPhone 8 and later: Press and quickly release volume up. Press and quickly release volume down. Press and hold the side button until the Apple logo appears.
For iPhone 7 and 7 Plus: Press and hold both volume down and the side button until the Apple logo appears.
For iPhone 6s and earlier: Press and hold both the home button and the top (or side) button until the Apple logo appears.
The device reboots without data loss. This troubleshooting step often resolves temporary software glitches.
Restoring Data After a Factory Reset
The reset completed. The device sits at the Hello screen. Now what?
Initial Setup Process
Select language and region. Connect to Wi-Fi.
The device contacts Apple’s activation servers. With internet connected, this takes seconds.
Choose how to set up the iPhone: restore from iCloud backup, restore from computer, transfer from another iPhone, or set up as new device.
Restoring from iCloud
Sign in with the Apple Account used for the backup. The device lists available backups with dates and sizes.
Select the most recent backup (or the specific one needed). The restoration process begins.
The iPhone downloads settings first, then apps, then app data and photos. This happens in stages.
Apps appear on the home screen with a dimmed icon and loading circle. They download in the background, prioritizing recently used apps.
Photo restoration timing varies based on library size and connection speed, with prioritization of recently used content.
Restoring from Computer
Connect the iPhone to the computer used for backup. Open Finder (Mac) or Apple Devices app (Windows).
Select the device when it appears. Choose “Restore Backup.”
If the backup was encrypted, enter the backup password. Select the correct backup from the list.
The restoration process transfers data from computer to iPhone. This typically completes faster than iCloud restoration since it uses cable connection rather than internet download.
What Returns and What Doesn’t
After restoration, most content returns exactly as it was. Apps reinstall to their previous positions. Photos reappear in the same albums. Messages restore with full history.
Settings return, including wallpapers, notification preferences, and accessibility options.
But Face ID and Touch ID require reconfiguration. Apple Pay cards must be re-added. Some apps may require signing in again, especially banking and financial apps with additional security.
The device won’t be completely identical. Some temporal elements like temporary files, cached data, and certain app states won’t restore.
Common Reasons for Resetting an iPhone
Why do people reset iPhones? The reasons vary widely.
Preparing to Sell or Trade
Before transferring ownership, factory reset removes personal information. Privacy protection authorities recommend removing personal information before disposing of any phone.
Beyond the reset itself, additional steps ensure security. Disable Find My iPhone. Sign out of iCloud. Remove the device from the Apple Account’s device list.
These steps together remove Activation Lock, allowing the new owner to set up the device with their own account.
Fixing Persistent Software Problems
When troubleshooting fails, factory reset becomes the nuclear option. Apps crashing repeatedly, severe battery drain, or system-wide glitches sometimes require complete erasure.
Starting fresh eliminates corrupted files, problematic settings, and software conflicts that accumulated over time.
But this should be the last resort. Restarting the device, updating iOS, and deleting problematic apps should be tried first.
Performance Optimization
Over years of use, iPhones can slow down. Cached files accumulate. Background processes multiply. Settings conflict.
Some users reset periodically—perhaps when upgrading to a major new iOS version—to maintain peak performance.
Whether this actually improves performance is debatable. Modern iOS versions manage resources efficiently. Still, anecdotal reports suggest fresh starts can feel snappier.
Returning Leased or Company Devices
Corporate iPhones or leased devices must be wiped before return. Companies typically require factory reset to protect confidential business data.
For corporate devices, Mobile Device Management (MDM) systems may be used to manage device security and configuration.
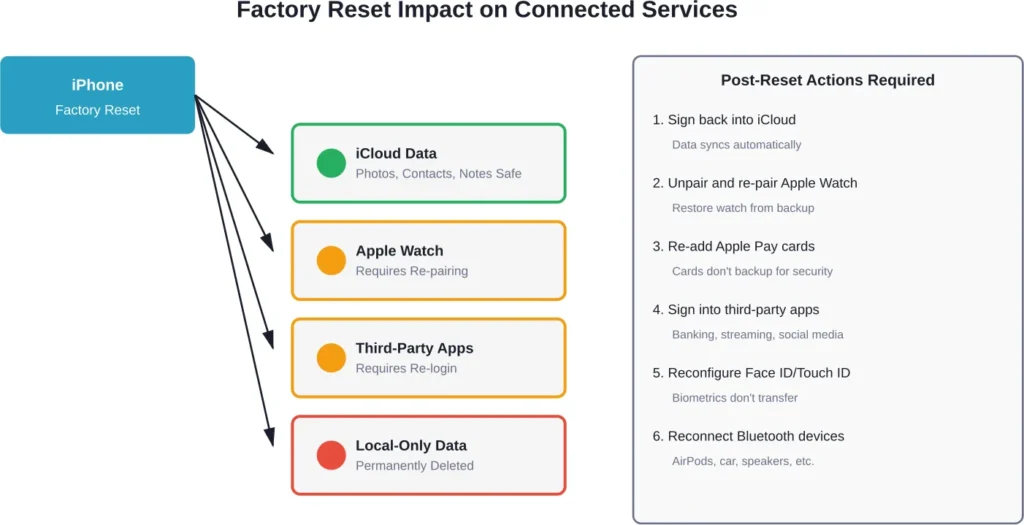
What Happens to Connected Devices and Services
Resetting an iPhone affects more than just the device itself.
Apple Watch Pairing
Factory resetting the iPhone doesn’t automatically unpair Apple Watch. Before resetting, the watch should be manually unpaired through the Watch app.
Unpairing creates a backup of the watch, making it easier to pair with the iPhone again after restoration or to pair with a different iPhone.
If the iPhone gets reset without unpairing, the watch remains locked to that Apple Account. Pairing with another iPhone requires erasing the watch and losing its backup.
iCloud Services
iCloud data remains safe in Apple’s servers. Photos in iCloud Photos, files in iCloud Drive, notes, calendars—all persist independently of device resets.
After signing back into iCloud post-reset, this content syncs back down to the device automatically.
However, content stored only locally (not synced to iCloud) disappears permanently unless backed up separately.
Third-Party Service Connections
App-based services like Spotify, Netflix, or banking apps lose their local authentication. They’ll require signing in again after restoration.
Account data remains on those services’ servers. Playlists, watch history, and account settings persist. Only the local device connection gets severed.
Some services limit simultaneous device connections. Resetting and restoring might not free up a device slot immediately, occasionally requiring manual deauthorization through the service’s website.
Two-Factor Authentication Considerations
iPhones often serve as trusted devices for two-factor authentication. After reset, the device loses this trusted status temporarily.
Signing back in with the Apple Account triggers two-factor authentication, sending verification codes to other trusted devices or phone numbers.
Once signed in and verified, the device becomes trusted again for future authentication.
Troubleshooting Reset Problems
Sometimes resets don’t go smoothly. Here’s how to handle common issues.
Can’t Complete Reset Due to Forgotten Passcode
If the passcode is forgotten, the device can’t be reset through Settings. Alternative methods become necessary.
Recovery mode allows resetting via computer without needing the passcode. Connect the iPhone to a Mac or PC, then force restart it while holding the appropriate button combination to enter recovery mode.
Finder or Apple Devices app detects the device in recovery mode and offers restoration options. This erases everything and installs the latest iOS version.
Activation Lock Preventing Setup
After reset, Activation Lock may prevent setup if Find My iPhone was enabled. The original Apple Account credentials are required.
If purchasing a used iPhone that’s activation locked, the previous owner must either remove the device from their account remotely or provide their credentials.
Without this, the device remains unusable. Apple Support cannot bypass Activation Lock without proof of purchase—it’s an anti-theft measure.
Reset Takes Unusually Long
Occasionally resets appear stuck. The screen shows the Apple logo and progress bar for extended periods.
Patience usually solves this. Devices with large storage capacities take longer. The process might take 30+ minutes in rare cases.
If the device truly freezes (no progress for over an hour), force restart may be necessary. This interrupts the reset, requiring starting over, but prevents indefinite hanging.
Unable to Restore from Backup
Backup restoration sometimes fails. Common causes include incompatible iOS versions, corrupted backups, or insufficient iCloud storage.
If restoring from iCloud fails, try restoring from computer backup instead, or vice versa.
As a last resort, set up as new device then manually reinstall apps and reconfigure settings. Not ideal, but functional.
Security and Privacy Considerations
Resetting an iPhone has significant security implications.
Data Recovery After Reset
Can deleted data be recovered after factory reset? The short answer: extremely unlikely.
Modern iPhones use hardware encryption. During reset, encryption keys get destroyed. Without these keys, encrypted data becomes mathematically unrecoverable.
According to NIST Special Publication 800-88 guidelines for media sanitization, cryptographic erasure methods render data access infeasible for a given level of effort. Modern iPhones use hardware encryption with keys destroyed during reset, making data recovery extremely difficult.
This makes factory reset acceptable for most consumer purposes when selling or recycling devices.
Secure Erasure Best Practices
For maximum security before selling, follow these steps:
First, create a fresh backup. Then sign out of iCloud, iTunes, App Store, and iMessage. Disable Find My iPhone. Only then perform factory reset.
After reset completes, verify the device shows the Hello screen and requires activation. This confirms erasure succeeded.
Remove the iPhone from the Apple Account device list through iCloud.com for complete disconnection.
Business and Enterprise Considerations
Corporate devices often contain sensitive data requiring additional security measures.
For corporate devices, Mobile Device Management (MDM) systems may be used to manage device security and configuration.
Some organizations require certificate-based erasure confirmation. IT departments can verify wipe completion through MDM consoles.
Alternative Solutions Before Full Reset
Factory reset is drastic. Less destructive options often solve problems without data loss.
Update iOS First
Many software problems resolve with iOS updates. Apple releases regular updates addressing bugs, security vulnerabilities, and performance issues.
Check for updates in Settings > General > Software Update. Installing the latest version often eliminates glitches without requiring reset.
Delete Problematic Apps
If one app causes crashes or battery drain, deleting and reinstalling just that app might suffice.
Offloading apps (Settings > General > iPhone Storage) removes the app but keeps its data, allowing clean reinstallation without losing information.
Clear Storage Space
Full storage causes numerous problems: slow performance, app crashes, inability to take photos.
Before resetting, try deleting old messages, removing unused apps, and clearing browser cache. Settings > General > iPhone Storage shows what’s consuming space.
Reset Specific Settings
As mentioned earlier, resetting just network settings or all settings (without erasing content) often fixes configuration problems without data loss.
Try these targeted resets before committing to full factory reset.
| Problem | Try This First | Factory Reset Needed? |
|---|---|---|
| Apps crashing | Update iOS, delete and reinstall app | Rarely |
| Wi-Fi won’t connect | Reset Network Settings | No |
| Device running slowly | Clear storage, update iOS, restart | Sometimes |
| Battery draining fast | Check battery health, identify problem apps | Rarely |
| Preparing to sell | N/A | Yes |
| Forgot passcode | N/A | Yes (via recovery mode) |
| Severe software corruption | Update iOS, restore from backup | Often |
iPhone Model-Specific Reset Variations
Different iPhone models support different iOS versions, affecting reset procedures slightly.
Newer Models (iPhone 11 through iPhone 17 Series)
According to Apple’s official documentation, iPhone models compatible with iOS 26 include iPhone 11, iPhone 11 Pro, iPhone 11 Pro Max, iPhone SE (2nd generation), iPhone 12 mini, iPhone 12, iPhone 12 Pro, iPhone 12 Pro Max, iPhone 13 mini, iPhone 13, iPhone 13 Pro, iPhone 13 Pro Max, iPhone SE (3rd generation), iPhone 14, iPhone 14 Plus, iPhone 14 Pro, iPhone 14 Pro Max, iPhone 15, iPhone 15 Plus, iPhone 15 Pro, iPhone 15 Pro Max, iPhone 16, iPhone 16 Plus, iPhone 16 Pro, iPhone 16 Pro Max, iPhone 16e, iPhone 17, iPhone 17 Pro, iPhone 17 Pro Max, iPhone Air, and iPhone 17e.
These devices all support the standard “Transfer or Reset iPhone” menu in Settings. The process is consistent across models.
Face ID models (iPhone X and later) require face recognition or passcode for reset confirmation. Touch ID models use fingerprint or passcode.
Older Models
Older iPhones running earlier iOS versions may have slightly different menu structures. Instead of “Transfer or Reset iPhone,” they might show “Reset” directly under General settings.
The functional outcome remains the same—complete erasure and restoration to factory state.
eSIM Handling
iPhones with eSIM (iPhone XS and later in most markets) present an additional choice during reset: erase eSIM or keep it.
Erasing eSIM removes the cellular plan entirely. The device will need carrier reactivation. Choose this when selling or switching carriers.
Keeping eSIM preserves the cellular plan. The same number and plan activate automatically after signing back in. Choose this when keeping the device but wanting a fresh start.
After the Reset: Setting Up Your iPhone
The reset completed. What comes next determines the device’s new life.
Set Up as New vs Restore from Backup
Setting up as new creates a completely fresh iPhone. No old settings, apps, or data transfer. Everything gets configured manually.
This option makes sense when troubleshooting persistent issues potentially caused by corrupted data in backups. Starting completely fresh eliminates any carried-over problems.
Restoring from backup brings back the previous environment. Apps, settings, photos, messages—everything returns to how it was before reset.
This option makes sense when resetting for performance reasons but wanting to keep existing data and configurations.
Quick Start Transfer
iPhones running iOS 11 or later support Quick Start, which transfers data from another iPhone held nearby.
During setup, when the new or reset iPhone shows the Hello screen, bring the old iPhone close. The old device detects the new one and offers to set it up.
This method transfers settings, Apple Account, and preferences wirelessly. It can also migrate all data directly from one iPhone to another.
Quick Start works well when upgrading to a new iPhone and planning to reset the old one afterward.
Essential First Steps
After basic setup completes, certain configurations should happen immediately.
Enable Find My iPhone. This activates Activation Lock and allows device location tracking if lost or stolen.
Configure Face ID or Touch ID. Biometric authentication provides security and convenience.
Set up Apple Pay if used. Cards must be manually re-added after any reset.
Review privacy settings. Check which apps have location access, camera access, and microphone access. Reset provides opportunity to grant permissions more carefully.
Enable automatic iCloud backups. Settings > Apple Account > iCloud > iCloud Backup > Back Up This iPhone. This prevents future data loss.
Long-Term Impact of Resetting
Does resetting an iPhone cause any lasting effects?
Performance Changes
Many users report improved performance after factory reset. Apps launch faster, battery lasts longer, and the interface feels more responsive.
Whether this stems from actual system improvements or placebo effect is unclear. Removing accumulated cached data and restarting background processes certainly can help.
But modern iOS manages resources efficiently. A properly functioning iPhone shouldn’t need regular resets for performance maintenance.
Battery Health
Factory reset doesn’t improve battery health. Physical battery degradation can’t be reversed through software.
However, reset might improve battery life if problematic apps or settings were causing excessive drain. Eliminating these through fresh start can extend daily battery duration.
Check battery health in Settings > Battery > Battery Health. If maximum capacity shows significantly degraded, battery replacement—not reset—is needed.
Warranty and AppleCare
Resetting doesn’t affect warranty or AppleCare coverage. These remain based on purchase date and service plan.
In fact, Apple Support often recommends factory reset as a troubleshooting step before hardware service. Resetting demonstrates that software solutions were attempted first.
Frequently Asked Questions
Yes, factory reset permanently deletes all data from the device through cryptographic erasure. The data becomes unrecoverable. However, if previously backed up to iCloud or a computer, the data can be restored from that backup after reset. Without a backup, deletion is permanent.
Factory reset always deletes photos stored on the device. To preserve photos, back up before resetting. If using iCloud Photos with optimization enabled, full-resolution photos already exist in iCloud and will re-download after signing back in. Alternatively, transfer photos to a computer before resetting. Using “Reset All Settings” instead of factory reset preserves photos but only resets settings, not solving all problems.
The erasure process typically takes 5-15 minutes depending on storage capacity. Devices with 512GB or 1TB storage may take slightly longer than 64GB or 128GB models, though the difference is minimal due to cryptographic erasure methods. Rarely, the process might extend to 30 minutes. If reset appears frozen with no progress for over an hour, the device may require force restart.
iCloud data remains completely safe on Apple’s servers. Factory reset only erases data from the physical device, not from iCloud. Photos in iCloud Photos, files in iCloud Drive, contacts, calendars, notes, and other iCloud-synced content persist independently. After reset, signing back into iCloud automatically re-syncs this data to the device. Only content stored exclusively on the device (not synced to iCloud) gets permanently deleted.
Yes, the Apple Account password is required during factory reset to disable Find My iPhone and confirm authorization. If Find My is enabled, the device cannot be erased without entering the Apple Account password. This security measure prevents unauthorized erasure and theft. The device passcode is also required initially. If either password is forgotten, alternative methods like recovery mode become necessary.
Only if Find My iPhone was disabled before reset. If Find My was enabled, Activation Lock remains active even after erasure. The device requires the original Apple Account and password to activate, preventing unauthorized use. This anti-theft feature makes stolen or found iPhones unusable without owner credentials. When selling, disable Find My first so the new owner can activate with their account.
The end result is similar—complete erasure—but the methods differ. Resetting through Settings is the standard method when the device is functional and passcode is known. Recovery mode reset via computer is used when the passcode is forgotten or the device won’t start properly. Recovery mode also installs the latest iOS version during reset, while Settings-based reset typically keeps the current iOS version unless updating is specifically chosen.
Conclusion
Resetting an iPhone triggers a comprehensive erasure process that returns the device to factory-fresh condition. Everything gets deleted—photos, messages, apps, settings, and configurations.
But this destruction isn’t inherently bad. When backed up properly, reset provides a powerful troubleshooting tool and ensures personal data doesn’t fall into wrong hands when selling or recycling.
The key lies in preparation. Back up first. Understand what gets erased and what remains in iCloud. Know how to restore afterward.
Different reset types serve different purposes. Factory reset for selling or severe issues. Settings reset for configuration problems without data loss. Force restart for temporary glitches.
Used appropriately, iPhone reset becomes a valuable tool rather than a terrifying last resort.
Before resetting your iPhone, create a backup through iCloud or your computer. Verify the backup completed successfully. Then confidently proceed knowing your data remains recoverable.
Need to reset your iPhone? Follow Apple’s official instructions in Settings > General > Transfer or Reset iPhone. And remember—backup first, reset second, restore third.